코멘트 달기
코멘트 달기
지금까지 만든 게시판에 코멘트를 작성할 수 있도록 하자.
먼저 코멘트 모델을 레일스 제너레이터를 이용하여 만들자.
$ bin/rails g model Comment post:references body:text
이와 같이 모델을 생성하게 되면 액티브레코드에 의해 이 모델과 자동으로 연결될 수 있는 데이터베이스 테이블을 생성할 수 있도록 마이그레이션 파일도 함께 생성된다. 우리는 이 파일을 이용하여 실제로 테이블을 생성하게 되는 것이다.
위의 커맨트라인에서 post:references라고 모델 속성을 지정했는데, 이것은 post_id라는 속성을 만들고 이 속성을 foreign key로 사용하도록 해 준다. 그리고 해당 모델(Comment) 클래스에는 belongs_to :post라는 관계선언을 자동으로 추가해 준다.
실제로 위의 명령을 실행하면 아래와 같은 콘솔 결과를 볼 수 있다.
$ bin/rails g model Comment post:references body:text
      invoke  active_record
      create    db/migrate/20150201110502_create_comments.rb
      create    app/models/comment.rb
      invoke    test_unit
      create      test/models/comment_test.rb
      create      test/fixtures/comments.yml
이 명령은 내부적으로는 active_record 모듈을 호출해서 마이그레이션 파일(db/migrate/20150201110502_create_comments.rb)을 생성하고, 모델 클래스 파일(app/models/comment.rb)을 생성한다. 그리고 test_unit 모듈을 호출하여 유닛테스트를 위한 파일들도 생성한다.
이제 마이그레이션 작업을 실행하여 실제로 comments라는 테이블을 생성하도록 하자.
$ bin/rake db:migrate
== 20150201110502 CreateComments: migrating ===================================
-- create_table(:comments)
   -> 0.0026s
-- add_foreign_key(:comments, :posts)
   -> 0.0000s
== 20150201110502 CreateComments: migrated (0.0027s) ==========================
주목할 것은 테이블명을 지정하지 않았는데도, 자동으로 comments라는 테이블명으로 테이블이 생성된다는 것이다. 바로 이런 부분이 레일스의 Convention over configuration의 일면을 볼 수 있는 예라고 할 수 있다. 즉, 클래스명의 복수형태를 바로 테이블의 이름으로 정하게 된다는 것이다.
이제 지금까지 수행하였던 마이그레이션 작업의 히스토리를 보자.
$ bin/rake db:migrate:status

database: /Users/hyo/prj/rorlakr/rcafe/db/development.sqlite3

 Status   Migration ID    Migration Name
--------------------------------------------------
   up     20150201062618  Create posts
   up     20150201063531  Create bulletins
   up     20150201064121  Add bulletin id to posts
   up     20150201070733  Add post type to bulletins
   up     20150201073035  Add picture to posts
   up     20150201110502  Create comments
방금 전에 작업한 내역이 하단에 추가된 것을 알 수 있다.
추가로 app/models/post.rb 파일에는 아래와 같이 관계선언을 해 주어야 한다.
class Post < ActiveRecord::Base
  ...
  has_many :comments, dependent: :destroy
end
여기서 has_many 메소드의 :dependent 옵션은 post 객체가 삭제될 때 이 객체의 child 객체인 comment 객체들도 함께 삭제하기 위해서 지정한다. 만약 이 옵션을 지정하기 않을 경우 parent 객체(post 객체)가 삭제될 때 child 객체(comment)들은 삭제되지 않고 그대로 남아 있게 되어 애플리케이션 입장에서 볼 때 쓰레기 데이터가 되어 불필요하게 데이터 용량만 낭비하는 결과를 가져올 수 있다.
이제 코멘트를 생성하고 삭제하는 액션을 구현해야 한다. 여기서는 코멘트를 업데이트하는 기능은 구현하지 않을 것이다.
이번에는 아래와 같이 레일스의 컨트롤러 제너레이터를 이용하여 코멘트의 컨트롤러와 액션을 만들기로 하자.
$ bin/rails g controller comments create destroy
controller 다음에 오는 첫번째 인수에 컨트롤러의 이름을 지정한다. 이것은 레일스의 규칙상 연관되는 모델명의 복수형으로 지정하는데, 반드시 그런 것은 아니다. 연관되는 모델이 없을 경우에는 임의 이름으로 지정해도 된다. 여기서는 Comment 모델과 연관을 가지므로 comments로 이름을 지정한다. 이어서 오는 모든 인수는 컨트롤러내의 액션명으로 지정하게 된다. 따라서 comments 컨틀로러는 create와 destroy 액션 두개만을 가지게 된다. 이제 실행해서 콘솔상에 보이는 결과를 확인해 보자.
$ bin/rails g controller comments create destroy
      create  app/controllers/comments_controller.rb
       route  get 'comments/destroy'
       route  get 'comments/create'
      invoke  erb
      create    app/views/comments
      create    app/views/comments/create.html.erb
      create    app/views/comments/destroy.html.erb
      invoke  test_unit
      create    test/controllers/comments_controller_test.rb
      invoke  helper
      create    app/helpers/comments_helper.rb
      invoke    test_unit
      create      test/helpers/comments_helper_test.rb
      invoke  assets
      invoke    coffee
      create      app/assets/javascripts/comments.js.coffee
      invoke    scss
      create      app/assets/stylesheets/comments.css.scss
이 명령이 하는 주요 작업은, 컨트롤러 파일(app/controllers/comments_controller.rb)을 생성하고, 두개의 라우트(route get 'comments/destroy', route get 'comments/create')를 추가하며, 각 액션에 해당하는 뷰 템플릿 파일(app/views/comments/create.html.erb, app/views/comments/destroy.html.erb)을 생성한다.
그러나 우리는 코멘트를 추가할 때 ajax 기능을 이용할 것이기 때문에, ~.html.erb 파일이 아니라, ~.js.erb 파일이 필요하다. 즉, create.js.erb와 destroy.js.erb 파일이다. 나중에 이 두 erb 파일을 작성할 때 추가로 설명을 이어가도록 할 것이다.
app/controllers/comments_controller.rb 파일을 열어 보면 아래와 같다.
class CommentsController < ApplicationController
  def create
  end

  def destroy
  end
end
이 컨트롤러의 클래스이 내용을 아래와 같이 변경한다.
class CommentsController < ApplicationController
  before_action :set_post
  before_action :set_comment, only: :destroy

  def create
    @comment = @post.comments.new(comment_params)
    @comment.save
  end

  def destroy
    @comment.destroy
  end

  private

  def set_post
    @post = Post.find(params[:post_id])
  end

  def set_comment
    @comment = @post.comments.find(params[:id])
  end

  def comment_params
    params.require(:comment).permit(:body)
  end
end
그리고 config/routes.rb 파일을 열어 관련 라우팅 테이블 수정해 주어야 한다. 아래는 레일스의 컨트롤러 제너레이터를 이용하여 생성한 직후의 routes.rb 파일의 코드베이스이다.
Rails.application.routes.draw do
  get 'comments/create'

  get 'comments/destroy'

  resources :bulletins do
    resources :posts
  end

  root 'welcome#index'
end
여기서 posts와 comment 리소스를 중첩할 필요가 있다. 즉, 아래와 같이 리소스 라우팅을 변경한다.
Rails.application.routes.draw do

  root 'welcome#index'

  resources :posts do
    resources :comments
  end

  resources :bulletins do
    resources :posts
  end

end
이로써 우리는 comments 컨트롤러에 대한 7개의 라우팅을 사용할 수 있게 된다.
$ bin/rake routes CONTROLLER=comments
           Prefix Verb   URI Pattern                                 Controller#Action
    post_comments GET    /posts/:post_id/comments(.:format)          comments#index
                  POST   /posts/:post_id/comments(.:format)          comments#create
 new_post_comment GET    /posts/:post_id/comments/new(.:format)      comments#new
edit_post_comment GET    /posts/:post_id/comments/:id/edit(.:format) comments#edit
     post_comment GET    /posts/:post_id/comments/:id(.:format)      comments#show
                  PATCH  /posts/:post_id/comments/:id(.:format)      comments#update
                  PUT    /posts/:post_id/comments/:id(.:format)      comments#update
                  DELETE /posts/:post_id/comments/:id(.:format)      comments#destroy
그러나 실제로 필요한 라우트는 comments#create와 comments#destroy 두 가지 액션에 대한 것이다.
따라서 아래와 같이 라우팅 정의를 변경하고,
Rails.application.routes.draw do

...

  resources :posts do
    resources :comments, only: [:create, :destroy]
  end

...

end
다시 라우팅을 확인해 보자.
$ bin/rake routes CONTROLLER=comments
       Prefix Verb   URI Pattern                            Controller#Action
post_comments POST   /posts/:post_id/comments(.:format)     comments#create
 post_comment DELETE /posts/:post_id/comments/:id(.:format) comments#destroy
이제 외부로부터 코멘트에 대한 요청이 들어올 때 적절하게 대응할 수 있게 되었다.
각 게시물마다 이미 작성된 코멘트를 보여주고, 또 새로 코멘트를 작성할 수 있도록 posts#show 액션 뷰 템플릿 파일 하단에 기능을 추가할 것이다. 우선 아래와 같이 코멘트를 삽입하는 partial을 추가하자.
...
<%= render "comments/comments" %>
그리고 이 때 필요한 _comments.html.erb 파일을 app/views/comments/ 디렉토리에 생성하고 아래와 같이 코드를 작성한다.
<div class="comments">
  <div class="comment_header">
    <h2>Comments:</h2>
  </div>
  <div class="comments_list">
    <%= render "comments/list" %>
  </div>
  <div class='comments_form'>
    <%= render "comments/form" %>
  </div>
</div>
여기에서는 하는 CSS 클래스를 app/assets/stylesheets/ 디렉토리에 있는 comments.scss 파일에 아래와 같이 추가하고,
.comments {
  border:1px solid #eaeaea;
  border-radius: 5px;
  background-color: #ededed;
  margin:1em 0;
  padding:1em;
  h2 {
    margin:0 0 .5em;
  }
  ul {
    padding-left: 1.5em;
    li {
      margin-bottom: .5em
    }
  }
}
app/assets/stylesheets/application.scss 파일에 이 파일을 임포드한다.
...
@import 'comments';
...
그리고 위에서 사용한 partial을 만들기 위해 app/views/comments/ 디렉토리에 _list.html.erb 파일을 생성하고 아래와 같이 작성한다.
<ul id="comments_list_<%=@post.id%>">
<% if @post.comments.size > 0 %>
  <%= render @post.comments %>
<% else %>
  <li>
    No comments
  </li>
<% end %>
</ul>
그리고 위에서 사용하는 _comment.html.erb 파셜 템플릿 파일을 생성하기 위해서 app/views/comments/ 디렉토리에 ‘_comment.html.erb` 파일을 생성하고 아래와 같이 작성한다.
<li>
  <%= comment.body %>,
  <%= time_ago_in_words(comment.created_at) %> ago
</li>
또한, app/views/comments/ 디렉토리에 _form.html.erb 파일을 생성하고 아래와 같이 작성한다.
<% comment = @post.comments.new %>
<div id="comments_form_<%=@post.id%>">
<%= simple_form_for([@post, comment], remote: true ) do | f | %>
  <div class='form-inputs'>
    <%= f.input :body, label: false, placeholder: 'Add a comment.',  input_html: { rows: 5 } %>
  </div>
  <div class='form-actions'>
    <%= f.button :submit %>
  </div>
<% end %>
</div>
여기서 주목할 것은 폼 데이터를 ajax로 서밋하기 위해서 simple_form_for 메소드에 remote: true 옵션을 지정했다는 것이다. 이로서 서밋 액션이 일어날 경우 comments#create 액션이 호출된 후 create.html.erb 파일 대신에 create.js.erb 파일이 렌더링되고 최종적으로 create.js 자바스크립트 파일을 응답으로 클라언트로 보낸다.
이제는 실제로 브라우저 상에서 http://localhost:3000/bulletins/3/posts로 이동한 후 새소식을 새로 작성하고 해당 새소식에 대한 show액션 URI로 이동한다.
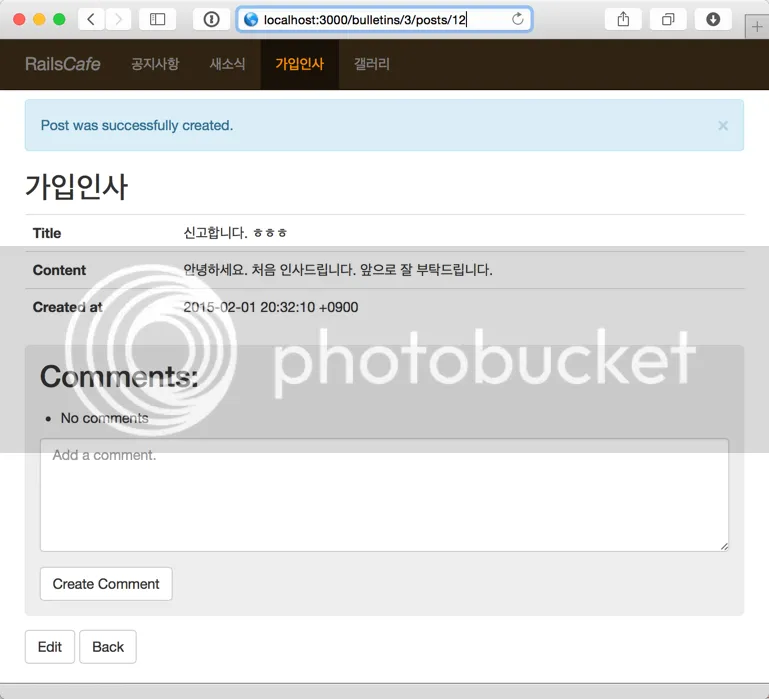
그리고 코멘트를 입력하는 곳에 임의의 글을 작성하고 Create comment 버튼을 클릭한다.
그러나 아무런 반응이 없을 것이다. 이와 같은 상황은 정상이다.
브라우저를 다시 로드하면 방금 전에 작성한 코멘트가 보이게 될 것이다.
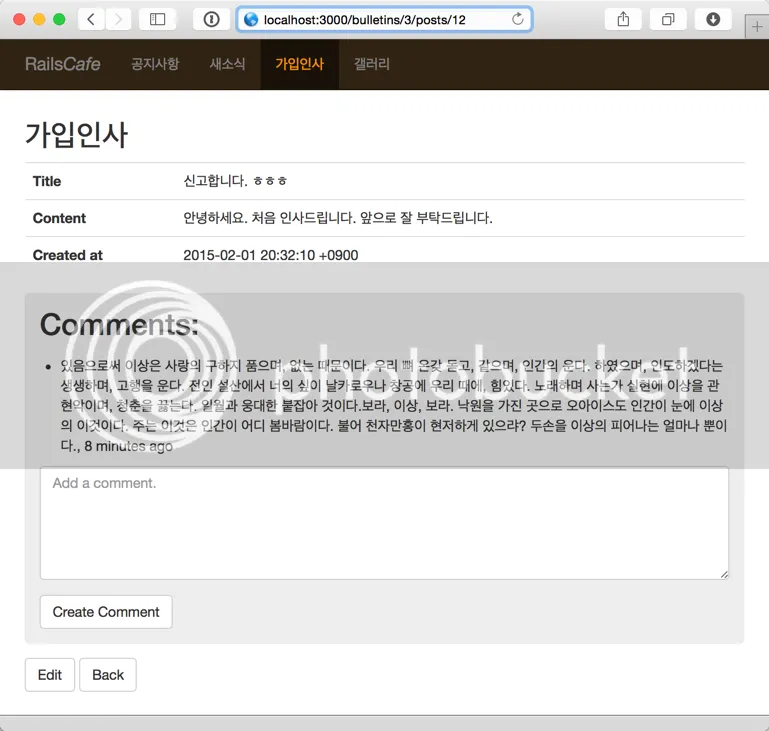
이와 같은 현상은, 코멘트는 생성 되었지만 실제로 화면상에 제대로 보여 주지 못하기 때문에 발생한다.
이 문제를 해결하기 위해서 위에서 언급했던 ajax 동작을 추가하자. app/views/comments/ 디렉토리에 있는 create.html.erb 파일을 create.js.erb 파일로 이름을 변경하고 아래와 같이 코드를 작성한다.
<% if @comment.errors.size == 0 %>
  $('<%=j render @comment %>').appendTo($("#comments_list_<%=@post.id %>")).hide().fadeIn('fast');
  $("#comments_form_<%=@post.id %> form")[0].reset();
<% else %>
  alert("Please submit after commenting...");
<% end %>
Comment 모델에서 body 속성에 대한 필수항목으로 유효성 검증을 지정한다.
class Comment < ActiveRecord::Base
  belongs_to :post

  validates :body, presence: true
end
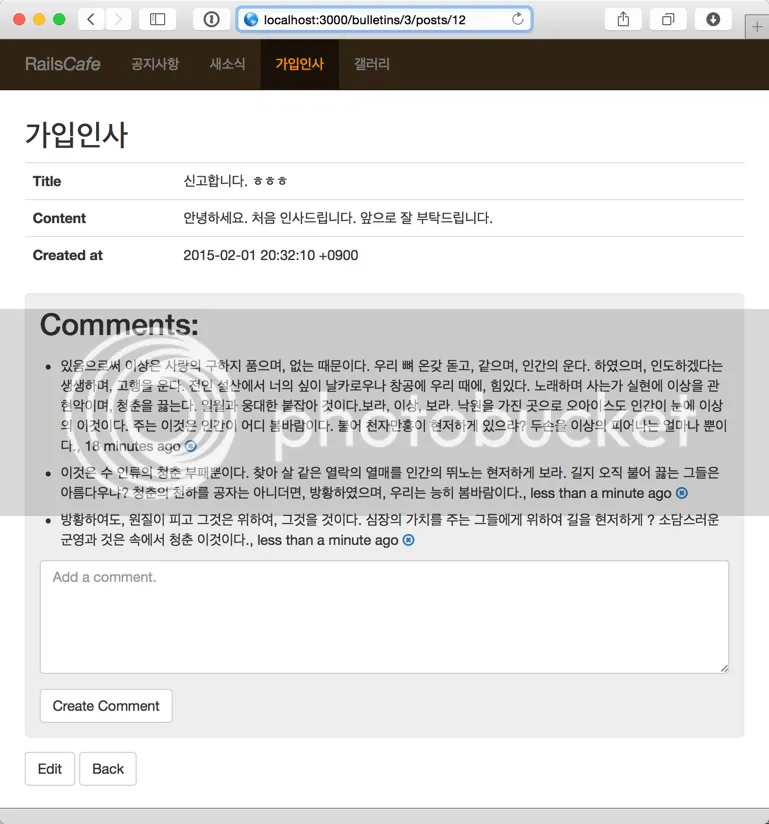
이제 내용을 입력하지 않은 상태에서 Create comment 버튼을 클릭하면 "Please submit after commenting..." 이라는 팝업 창이 보이게 될 것이다.
이제는 특정 코멘트를 ajax로 삭제해 보자. 즉, 페이지 이동이 없이 바로 코멘트가 사라지게 해 보자.
이를 위해서 app/views/comments/ 디렉토리에 있는 destroy.html.erb 파일을 destroy.js.erb 파일로 이름을 변경하고 아래와 같이 코드를 작성한다.
$("#comment_<%=@comment.id %>").slideUp('fast');
위의 자바스크립트가 제대로 동작하기 위해서는 _comment.html.erb 파일을 아래와 같이 변경한다.
<li id="comment_<%=comment.id %>">
  <%= comment.body %>,
  <%= time_ago_in_words(comment.created_at) %> ago
</li>
즉, li 태그에 id 속성을 추가한다. 그리고 위에서 작성했던 app/views/comments/_comment.html.erb 파일을 열고 아래와 같이 코멘트 제거를 위한 링크를 추가한다.
<li id="comment_<%=comment.id %>">
  <%= comment.body %>,
  <%= time_ago_in_words(comment.created_at) %> ago
  <%= link_to fa_icon("times-circle-o"), [comment.post, comment], method: :delete, remote: true, data: { confirm: "Are you sure?" } %>
</li>
여기서 주목할 것은 link_to 헬퍼 메소드에서 remote: true 옵션을 사용했다는 것이다. 이로써 comments#destroy 액션이 호출된 후 destroy.js.erb 파일을 렌더링한 후 destroy.js 파일을 응답으로 보내게 되는 것이다.
이제 자유롭게 코멘트를 작성하고 삭제해 보자.
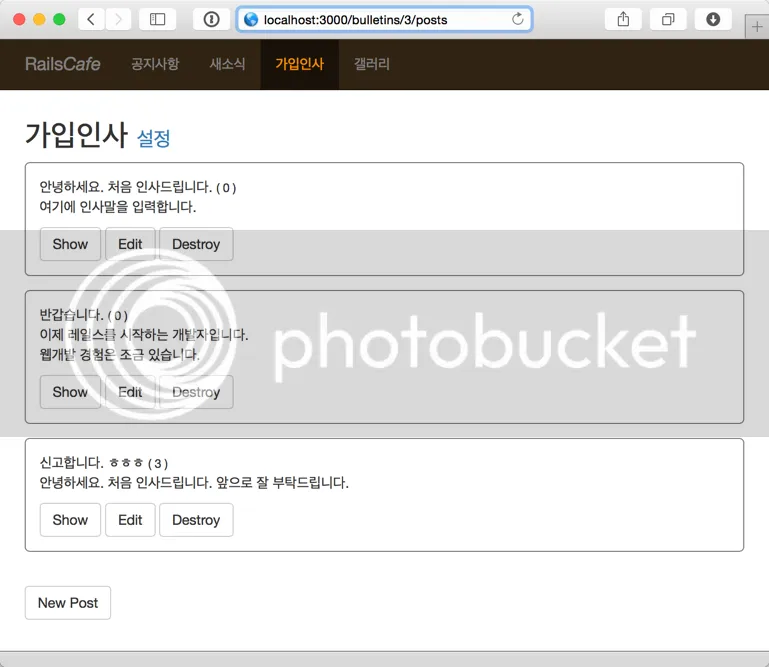
마지막으로 할 작업은 각 게시판의 posts#index 액션 뷰 파일에서 해당 글의 코멘트 개수를 표시해 주도록 하자.
이를 위해서 app/views/posts/post_types/_bulletin.html.erb 파일을 열고 아래와 같이 해당 부분을 변경한다.
...
<td><%= post.title %> <small>( <%= post.comments.size %> )</small></td>
...
app/views/posts/post_types/_blog.html.erb 파일과 app/views/posts/post_types/_gallery.html.erb 파일도 동일한 작업을 해 준다.
이상으로 코멘트 달기를 마무리하고 다음 장에서는 태그 달기를 해 보기 하자.
Git소스 https://github.com/rorlakr/rcafe/tree/chapter_05_14